Showing posts with label Food. Show all posts

Saturday, December 1, 2012

Be My Guest

The menu!


Ever since I was a little girl I've always wanted to step inside the world of Beauty and the Beast.  It's been a dream of mine since I was six and now, at the ripe age of twenty-seven, I have lived my dream. 

The Be Our Guest restaurant opened at Disney World's Magic Kingdom on November 17th.  Chris and I went within the first week of it opening and I could not have been more excited!  The woman who took us to our seats was laughing at how giddy and in awe of everything I was.  Yep, I am that adult who acts like a five year old child at Disney.  And I am not ashamed.


When you walk up to the restaurant doors you see a beautiful stained glass window that depicts the first part of the Beast's story.  The double doors open as you approach them and you walk into a huge entry way (no pictures, sorry!).  My mouth dropped open at this point, everything was beautiful!  As you step into the dinning room you realize that you've actually stepped inside the Beast's grand ballroom.  There are no words to describe just how gorgeous it is.  It looks exactly like I always dreamed it would.

There was a cute little sign for the restaurant on  an
archway that was connected to the bridge that led
you up to the front doors of the restaurant!
Since we ate when it was dark out I had to go back and get some
of these photos.  This was the front door that led you into the entry way.
The stained glass window!  If you've watched the movie as many
times as I have, you'll know what part these pictures are from!
This was inside the entry way on the left hand side.
It was beautiful!  If you can't tell, I was really really excited!
The West Wing was off to the right side of the ballroom and there was also a room where the Beast waited for you to finish dinner so he could greet and take a picture with you.  On the far side of the ballroom was a wall of windows that framed the mountains in the distance.  On the ceiling were not one, but three chandeliers as well as the painting of angels from the movie.  There was also a second floor to the ballroom that was probably all for show but very visually appealing.

I don't think I paid much attention to Chris at dinner.  I was
too busy taking everything in!
Chris and I swear that we will go back and eat at this restaurant again.  The food was delicious!  We both had strip steak with assorted vegetables and fries.  We also got a bottle of wine (the only restaurant at the Magic Kingdom that serves alcohol) and also decided we had just enough room left in our stomach's to eat a dessert.  Since I have a food allergy, I am never sure if I can have dessert at a restaurant and usually steer clear of it.  But, Chris and I decided to ask about it anyway and we found out that I can have the dessert at this particular restaurant (score!).  We ordered a strawberry cupcake and devoured it in less than two minutes.  I'm pretty sure we were a little drunk off the wine and on a food high when we left.  

Delicious, delicious food and wine!

This is the only picture I took of the castle.  I know, I know.  Shame on me!
But at least it has the fireworks behind it. Do I get bonus points for that?!

Sunday, November 18, 2012

Pinterest Party Success!

After a hectic day yesterday it's nice to sit down with my cup of coffee, catch up with a few friends, and settle in for a nice relaxing day at home.  We're exhausted from all of yesterday's excitement  and quite satisfied with the outcome of our crafting skills.  Let's just say that the Pinterest Party was a huge success, and now that I have the first one under my belt I cannot wait to do more!

{You can find my original party post here if you're a little unsure of what a Pinterest party entails}

For my party everyone brought one dish they wanted to try and all the materials to make a fall or winter wreath.  We spent the first hour and a half tasting all of the food and catching up. {Silly me forgot to take pictures of the food!  I guess I was just too busy chowing down!} After our stomachs were satisfied we grabbed our supplies and sat down to craft to our hearts content!  The crafting part of the party probably took about an hour and a half to two hours total.  It was so much fun to see what everyone else was done, and there were a lot of different projects going on!  I think each one reflected the makers personality perfectly, and we're all extremely proud of the outcome!
My sister J did a Christmas wreath with birds on it.  The original picture that she modeled her wreath after, is from Michaels Arts and Crafts store.  It came out so well and is so unique!  S was in love with the birds and I won't be surprised if she goes back to Michael's to make a wreath similar to the one made.  My favorite part of the entire project (beside the birds, which are super cute!) was the snow-in-a-can that used to give the wreath a "wintery" feel.  

I love that K's wreath was completely different than the rest of ours.  She used a styrofoam tube as the base and pinned felt to it to get the look the see in the picture.  It is so unique and fun!  K told us after we were done that using pins to keep the felt in place wore her fingers down during the process though, so if you are thinking of trying this version you may want to get something that will protect your fingers!    
At first, S wanted to do her own version of this wreath, but ended up with a finished product that looked more like a variation of the hydrangea wreath.  There were a few people (myself included) who did different versions of this.  The most unique part about the whole wreath was that S wrapped her letter in ribbon which gave it a completely different effect.  
L and I did different versions of S's wreath (see above).  I love L's wreath because the colors match the theme of her house and not only is it chic, but it is very unique to her taste.  Oh...and the colors are gorgeous of course!
All the ladies with our newly crafted wreaths!
There is one person whose wreath I did not get a picture of in an individual shot, and that is E's (top row, second from the right).  E made hers with coffee filters and the reason I don't have a finished shot is because she is not done with it yet.  Hopefully she will send me a picture with the finished result because I am so anxious to see it!  I absolutely adore the coffee filter idea and love how full her wreath is!  Even if she just put a bow on it I think it would look fantastic!    
Before everyone left I had a small surprise for them.  I wanted to say thank you for coming and to give them all a little momento to remember the day by.


And here are the bags they went in:


Even though I was stressing a bit, the party turned out to be a success and we all had lots of fun!  I am very excited to have left over snacks to eat and new recipes to print out for my recipe binder!

For now, I'll leave you with a few links for some of the food my guests made:
1.  Strawberry Cheesecake Bites: verdict?  A hit!  People gobbled them up.
2.  Moscato Spritzer: verdict?  Okay, not my personal favorite but still pretty good!
3.  Lemonade Punch: verdict?  Delicious!  I will definitely be making this again!
4.  Strawberry-Mint Water: verdict?  Holy cow.  I loved it!  In fact, I'm having a glass right now!
5.  Easy Parmesan Knots: verdict?  The best bread I've ever had.  Seriously!

There were also meatballs, spinach and feta cheese dip, shrimp dip, and blue cheese bread bites!  I'll have to get the recipe for all of those and update this when I do.  Everything was delicious though and my mouth is still watering thinking of all the deliciousness!

I hope you've enjoyed my long picture filled post!  And I also hope that it has inspired you to do some crafting of your own!

post signature

Thursday, November 1, 2012

Favorite Fall Recipes

The weather finally seems to have evened out and has been consistently cooler over the past few days.  Cold fall weather always makes me want to curl up on the couch in my jammies with a bowl of whatever warm and comforting meal I cooked in my crockpot that day.  That is my ideal fall day.    

My favorite thing about cooking in the crockpot is that it usually takes about ten minutes of prep time and then I can just let it cook all day without having to lift a finger!  Ahh...perfection!

Here are my top five Fall Recipes:

1.  Pulled Pork!  I use the recipe on the back of the slow cooker seasoning packet you get at the grocery store.  It's delicious!
2.  Crock Pot Chicken Taco Chili!  A friend turned me onto this recipe and it has now become a staple in my household.  Chris hates chili but I would cook it for my sister all the time, put it over rice, and chow down to our hearts content.  Yum!
3.  Slow Cooker Baked Potato Soup!  Who doesn't love soup on a cool fall day?  This is another recipe we make at least once a month.
4.  BBQ Ribs!  Yep, you read that right.  You can make BBQ Ribs in the crockpot!  This is a fairly new recipe that I've tried but Chris and I love it!  There was lots of basting involved during the last few hours of cooking but it paid off and the meat practically fell off the bone once it was done.
5.  Italian Roast!  I love roast recipes!  They're so easy to make and so delicious once they are done.  I can't find the recipe anywhere on line so here it is!
     Ingredients:
          - 4 to 6 lb. chuck roast
          - 1 packet ranch seasoning (buttermilk recipe)
          - 1 packet ground gravy mix
          - 1 packet zesty Italian mix
          - 1/2 cup water
     Directions:
          - Combine ranch, Italian dressing, brown gravy, and water in a separate bowl and mix together.  Pour over chuck roast in the crockpot.
          - Cover and cook on Low for 6-10 hours.

There it is!  My favorite five fall crockpot recipes.  Do you have any recipe staples in your home?  If so, share in the comments below!

Thursday, October 11, 2012

Making and Canning Apple Butter

Since it's been fall for a little less than a month now, I figure it's high time I start making my house feel (and smell) like it.

I have been seeing so many recipes for apple butter lately.  I have never had it before but it looks so delicious that I was persuaded to make it myself.  Before starting I did some research on the best apples to use (Gold), what recipe was highly reviewed, and how to preserve the excess apple butter (ie: can) for later use.

I went out and bought 12 pint sized Kerr jars from Target for $7.99 for canning.  I also bought 2 dozen apples from the supermarket for my recipe (I already had all the other ingredients at home).

After reading the instructions for the Apple Butter recipe I modified it a bit:
-5 1/2 lbs. apples, (peeled, cored, and finely chopped)
-3 cups white sugar
-1 cup brown sugar
-Juice from one lemon
-1 tsp ground nutmeg
-2 tspns ground cinnamon
-1/4 tsp ground gloves
-1/4 tsp salt
(SIDE NOTE: My recipe filled two pint sized jars.  If you're using smaller jars (1/2 pints) then it would probably fill four.)


All of my supplies (minus the apples, they were already chopped
up and in the crockpot at this point).
I cut up my apples into extremely small pieces so they would break down easier during cooking.  While they were sitting in the crockpot I mixed together the sugar, lemon juice, nutmeg, cinnamon, ground cloves, and salt in my mixer.  Then, I combined the apples and the mixture in the crockpot and let it cook on high for an hour.

After an hour I set the crockpot on low and went to bed.  Ten hours later, this is what I woke up to.

Truthfully, I wanted to dig in right then and there.  But, it still needed to cook a little longer so I had to wait.

While I was waiting for the mix to thicken I put a few of the mason jars in the running dishwasher to keep them warm before I started the canning process.

After that I blended my apple butter because I didn't want mine chunky.

To make sure I preserved my food safely and correctly, I followed these instructions from Fresh Preserving.

The proper way to can apple butter is to leave half an inch of empty space at the top and to boil the can for 10 minutes.  I don't have the "proper canning equipment" so I just used what I had.
You can buy proper canning equipment here
This is the point in the project where all I can do is sit back and pray that everything works the way it is supposed to.  You have to give the cans 24 hours to cool down and set (which is the hardest part for me).
Make sure you hear a "pop" noise!  That
means the lids have sealed properly!
And, that's it!  If you have any questions or if something is unclear please leave a comment and I will get back to you as soon as I can!

Just a few quick tips:

  • Some people have said that the recipe is too sweet.  I love sweet things so that isn't a problem for me, but if you are not a super sweet lover I'd suggest cutting down the white sugar by at least a cup.
  • I constantly stirred the apples because I was afraid it would burn on the bottom.  I'm not sure if this is really necessary, but it worked for me!
  • I left the mason jars in the dishwasher while the butter finished cooking to keep them warm!  Never put hot food in a room temperature jar before canning!  You take the chance of the jar cracking during the canning process.
  • You do not have to can the apple butter!  You can freeze it or you can just put it in the fridge if you think you'll use it all right away.
  • If you do decide to can your apple butter (a must if you're giving it as a gift to someone!) check how long you should boil it in the water.  The time differs based on the altitude.  
  • Always, always, always use non metal tongs to pull the jars out of the boiling water! 

Thursday, August 30, 2012

D-I-Y Notepad

I have been longing for a cute grocery list that is easy to carry to the store.

Usually I just write a list on my phone but who wants to hold the phone in their hand as they are trying to bag produce?  Definitely not me!  It's an unneeded annoyance and I'd rather do without.  

I loved the grocery list that Ellinee shared on her blog but the colors didn't match the theme of my kitchen and I wanted to be able to hang my work proudly on the fridge.  So I asked Chris to help me and this is what we came up with:
I think it is pretty adorable if I do say so myself!

It has mostly everything I get at the grocery store on a regular basis and spots to fill in extra items when they are needed.  This is going to be so much easier than pulling out my phone every time I can't remember the things I need to buy!

If you want to use it (or make your own) here is what you need:

Supplies:
-pdf file to print (download it here (personal use only please!)-- or you can make your own)
-8.5" x 11" paper
-printer
-paper cutter
-glue (I used mod podge)
-heavy books or clothespins 
-clip magnets to hang the pad on the fridge

How to:

1.  Open the pdf file on your computer and make sure your printer is loaded with paper.  Click print and print a test page to make sure everything is aligned properly and you like the way it looks.  

2.  If you love the outcome, go ahead and print as many pages as you'd like!  I printed twenty so I ended up with forty individual sheets for my fridge.

3.  Cut the printed 8.5" x 11" in half vertically so you end up with 4.25" x 11" grocery list sheets. 

4.  Holding the notepad upside down, tap the top edge on a table until all the edges are perfectly aligned.  Clip one magnet to each side of the top of the notepad to hold the pages together.
I used my finger to apply the mod podge .
Remember, less is more!

5.  Spread glue on top of the notepad.  Make sure all the edges are coated with glue but do not use too much because the paper will ripple!  After gluing, use an additional two clothespins to clam the center.  You could also just set a heavy book on top of the notepad to keep the paper together.
I kept the magnets clipped to the paper until
I grabbed a few books to put on top of it instead.
6.  Let the glue dry and remove the books.  I left the books on top for about fifteen minutes, but you can leave them on longer if you feel more comfortable with that!  If you opt to keep the magnets on it instead, remember that if you keep them on too long they'll leave indentions on the paper!
Chris's old college books came in handy for this project!
You're done!  That project was super easy and it turns out so cute!  

Total Cost?
Magnet Clips: $2.05 from Target.  
I already had everything else! 
Now, that is one heck of a deal!  

So..what do you think?!

Thursday, August 16, 2012

Strawberry-Pineapple Smoothie

I went to Costco today and decided to buy a few pineapples for snacks and to dehydrate (Chris has been asking for it lately).  I haven't had a smoothie in a while and thought that a strawberry-pineapple concoction sounded delicious!  And boy was I right!  

Want the recipe to try?  I'm sure if you love pineapples and strawberries as much as I do you'll be just as obsessed with this smoothie as I am!

Strawberry-Pineapple Smoothie

Ingredients:
1 cup strawberries (frozen or fresh)
3/4 cup milk
3/4 cup pineapple juice
1/2 cup vanilla yogurt (I used Greek)
2 tbspn white sugar
6 ice cubes

Directions:
1.  Place all ingredients in a blender and blend until smooth.  You may have to scrape down the sides of the blender a few times.
2.  Place in a glass and ENJOY!  

Thursday, August 2, 2012

Mint Chocolate Chip Cookies

My husband loves Mint Chocolate Chip ice cream.  And key lime pie.  And sugar cookies.  

But other than that he's not really a dessert kind of person.  We don't eat a lot of junk food in our house for that purpose.  And because if I do make something sweet I know I'll be the only one eating it and my thighs would not thank me for that one bit.

I do have those moments where my sweet tooth is screaming for some junk food and I don't have the willpower to say no.  So when Chris came home a few weeks ago talking about a dessert recipe he found online I knew I was going to have to try it.

You can find the original Mint Chocolate Chip Recipe on allrecipes.com.  I'm sure that as soon as you see the picture your mouth will start to water like mine did.

There were just a few issues I had:
-I don't like using prepackaged cookie mix (usually because I can't have it due to allergies) so I made chocolate chip cookies from scratch and just added the other ingredients to make them minty and delicious!
-I could not find creme de menthe baking chips at my grocery store so I substituted Andes mints (I love going to Olive Garden just to get one at the end of my meal!).
-Instead of mint extract I used peppermint extract.  It was all I had on hand at my house and I didn't feel like running out to the store!

Okay!  I think that's about all the issues I had.  Here is how I made the cookies:

Mint Chocolate Chip Cookies
Ingredients:

Original Chocolate Chip Cookie recipe: 
2 1/4 cups all-purpose flour
1 tsp baking soda
1/2 tsp salt
1 cup (2 sticks) butter, softened
3/4 cup granulated sugar
3/4 cup packed light brown sugar
1 tsp vanilla extract
2 eggs

Additional ingredients:
1/4 tsp peppermint extract
6 drops green food coloring
1 package of Andes Mints (this equals 1 cup)
1 cup semisweet chocolate chunks

Directions:
  1. Preheat oven to 350 degrees.
  2. Stir together flour, baking soda, and salt.  Beat butter, granulated sugar, brown sugar and vanilla in large bowl with mixer until creamy.  Add eggs; beat well.  Gradually add flour mixture, beating well.  Stir in peppermint extract, food coloring, mints, and chocolate chunks.
  3. Using a spoon place dough onto ungreased cookie sheet (about 2 inches apart).
  4. Cook for 8-10 minutes then let them cool for 3 minutes.
  5. Serve warm or let them cool completely and store in an air-tight container for later.

Thursday, July 26, 2012

Mouthwatering Deliciousness

Hey readers!  I just wanted to share a great food blog that I came across today:


She has so many amazing recipes to try and I am positively drooling over the way she organized everything!  

I put a link to her blog on my Follow These Blogs tab above and will also be adding some of the recipes from her blog to my Google site (which has been going through some renovations of it's own!).

WARNING: You could get stuck browsing her blog for hours.  So unless the kiddos are napping and you have an endless amount of time on your hands, leave it for later.  Because once you start looking, it'll be hard to stop.  ;-)

Tuesday, July 24, 2012

Homemade Granola

I found the easiest homemade granola recipe.  There are only five ingredients and it takes about half an hour to make, including prep time.  And I had everything in my kitchen so I didn't even have to run to the store!

There are a few things to remember when making granola:

  • It's only good for a week so make a little at a time!  You can always make more later!
  • You can add anything you want to this recipe: nuts, cranberries, raisins...the options are endless!
  • Always store in an airtight container!  I think a glass one you could set on your counter would work perfectly (and it would look cute too!)!
Homemade Granola Recipe
Need:
     2 cups Old Fashioned Oats
     1/4 tsp cinnamon
     1/4 tsp salt
     2 tbspn unsalted butter
     1/4 cup plus 1 tbspn of honey

Directions:
     1.  Preheat oven to 300 degrees.
     2.  In a medium bowl combine oats, cinnamon, and salt.
     3.  In a small saucepan heat honey and butter over medium heat and cook until butter has just       melted.  Pour over oat mixture and cover well.
     4.  Pour granola out onto a baking sheet (if you leave it slightly chunky bigger chunks of     granola form).  Bake for 20-25 minutes, until mixture is golden brown.  
     5.  Cool to room temperature before storing it in an airtight container.  Remember, it's only good for one week!

Strawberry Granola Smoothie

I love smoothies.  I honestly could eat one for breakfast, lunch, and dinner and be completely happy.  Ever since we got our blender I've been searching Pinterest for some delicious recipes and I'm happy to report I've found a breakfast one that I just love!

For this smoothie I make my own granola because it's very hard for me to find granola at the grocery store because of my nut allergy.  I also use frozen strawberries from Costco and omit the bananas from the original recipe (I'm slightly allergic to those too).

I'm slightly adapting the recipe from this site.

Need:
     8 frozen strawberries
     1/2 cup granola
     1 cup non-fat vanilla yogurt (I use Greek)
     1 cup 1% milk
     1/2 cup ice cubes
     2 tbspn honey (optional)

Directions:
     1.  Blend all ingredients together in blender.
     2.  Pour in a cup and enjoy!


Don't worry!  If you have leftovers and you're too full to eat them there are some easy ways to store it for later consumption!

  • You can freeze the leftover smoothie in ice cube trays to save for later! 
  • Put the smoothie in a thermos to keep it cold if you want to take it to work with you.  Put it in the refrigerator once you get there and go back for it when you're ready for some food!
  • Instead of a thermos, you can put the smoothie in a glass jar or pitcher.  Make sure to fill it to the brim otherwise you could have a large quantity of air that comes in contact with the mixture.  Seal the jar or pitcher with with a lid or cling wrap.

Tuesday, July 10, 2012

Smoothie Heaven

White Gummi from Jamba Juice

Whenever Chris and I go to California we always visit Jamba Juice.  They have the best smoothies I have ever had in my entire life!  The first time Chris took me there he bought me the White Gummi which is on their secret menu.  Do you remember what the white gummy bear tastes like?  Well, that's exactly what this smoothie tastes like!  

If you like smoothies at all try this recipe!  Seriously, you won't regret it. 


Ingredients:
   
8oz peach juice
4oz soy milk (I used whole instead)
1/2 cup pineapple sherbet
1/4 cup raspberry sherbet
1/4 cup orange sherbet
1/2 cup frozen mangos
1/2 cup ice

**Place all ingredients into a blender and blend until you get a "smoothie" consistency**  

**Fills 4 (8oz) glasses


I used the Kitchen Aid Blender from Bed Bath and Beyond and we love it!  I did a lot of research on what blender to get and this is one of the best reviewed ones.  A few people have had problems with the container leaking but we haven't had any problems with it so far!  So far, I give it an A+  

Sunday, July 1, 2012

Meal Planning

How-To: Monthly Meal Planning Guide

For the past few months I've been using a homemade calendar to plan our meals for the month.  I usually go out and buy most of the ingredients (the ones I can freeze or are canned) and then go out every week and a half and buy the perishable items needed for my recipes.  This has worked out fairly well and it helps me keep a low grocery budget every month.  I go to Costco once a month and buy the bigger things that we'll need along with most of the meats I'll need.  When we get home, I'll divide up the meat (mostly ground beef) into ziploc bags consisting of either one or two pounds.  We also buy the big bags of Perdue chicken (my favorite)  and one bag can usually last us between 45 and 60 days.  

Most of our monthly grocery budget comes from my trips to Costco.  Since I buy in bulk I pay a little more, but the food I do buy lasts me a lot longer than going to the regular grocery store.  And it's nice to go to the grocery store and only have to buy a few things at a time.  I used to coupon (and sometimes I still do if I find a really great deal), but I found that I don't really save that much doing it.  Maybe it's because I go to Costco and buy in bulk or maybe it's just because I'm not that dedicated to couponing.  Whatever the reason, I've found that it's just not for me.  I can keep our monthly budget low without them and I'm happy with how little money I spend on food.

Below is our July Meal Planning Calender.  Most of these recipes are new to me (I'll let you know how they turn out) but I try to do at least a few new ones each month.  My husband is a bit of a picky eater so when I find a recipe he likes, I usually jump on it.  

All the recipes in green are cooked in the crock pot.  There are also recipes that have a red star next to them which means they are new to us.  I always run the recipes by Chris to make sure he'll actually eat them (this can get frustrating sometimes) but in the end we're both happy with what we'll be eating.  I also try to give us one or two days where we budget for eating out.  I know that at least one day this month we'll be going out with our friends.  I also have a lot of blank days during the week because we always have leftovers after I cook and we do not like to waste anything.  So...we usually eat something for two days before moving on to the next meal.  But if we don't have any leftovers, I just skip to the next recipe and continue from there.  We're pretty flexible.  

I'm going to leave you with a few of our favorite recipes.  Please visit this site to find them and feel free to use the recipes for your own family!  

UPDATE: You can only view the files if you have a google account.  If you don't have one, you can download it to your computer and view it that way!

Tuesday, June 26, 2012

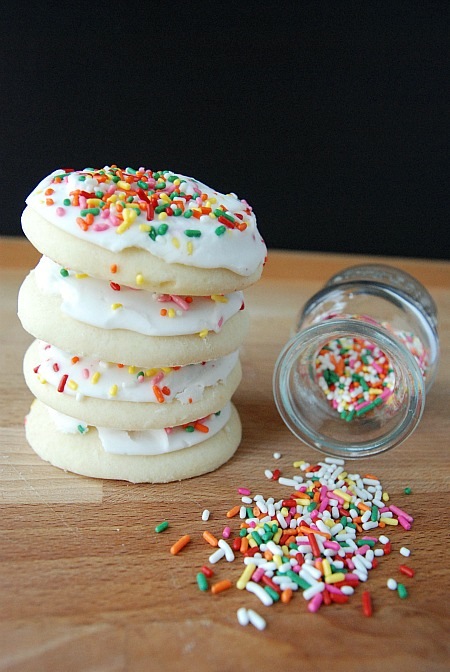
Delicious Desserts: Soft Sugar Cookies

I've been looking for an excuse to make knockoff lofthouse sugar cookies and I think I finally found one!

This weekend my dear husband and I are going to a cookout.  My best friend's husband is finally back after being away for five months for Army training so we're celebrating his birthday and his return with an epic bbq.  He's going to make his famous bacon explosion (it's a heart attack waiting to happen...but yummy) and bbq chicken.  I'm not looking forward to the 95+ degree weather but I am really excited to see all my friends!

When starting the recipe, I didn't realize the cookies take a few days to make.  I'm actually glad I started a few days early because they would not be done for the cookout in time if I hadn't!

Things to keep in mind when making them.
-The dough is really really sticky.  I know the recipe says it's sticky but I was not expecting it to feel like it did.  Make sure you have plenty of flour to put on the counter so you can roll it out before you store it overnight in the fridge.
-It's a pain in the butt to wrap it with plastic wrap when it's sticky.  I have no good tips on ways to do it.  All I can do is wish you luck.
-You're going to want to eat all the dough.  Restrain yourself!  Trust me, it's worth it.


Ready for the recipe?

Ingredients

For the cookies:
6 cups flour, divided
1 teaspoon baking soda
1 teaspoon baking powder
1 cup butter, room temperature
2 cups granulated sugar
3 eggs
1 teaspoon vanilla extract
1 1/2 cups light sour cream (it says light in the instructions but in the comments on The Novice Chef site says to use regular sour cream)


For the frosting:
1 cup butter, room temperature
1 teaspoon vanilla extract
4 cups powdered sugar
6 tablespoons heavy cream
Sprinkles

Day One
Instructions

For the cookies:
In a medium bowl, whisk 5 cups of flour, baking soda, and baking powder.  Set aside and pull out your stand mixer.

In the bowl for your stand mixer, cream the butter and sugar at medium speed until light and fluffy.  Scrape down the sides of the bowl with a rubber spatula as needed.  Add the eggs (one at a time) until each incorporated in the butter/sugar mix.  Add the vanilla and sour cream and beat at low speed until combined.

Add the dry ingredients and beat at low speed until just combined (about 30 seconds), scraping down the bowl as needed.  You need to make sure the dough has the right consistency for rolling so add an addition 1/4 cup of flour at a time (up to 1 cup more of flour).

Divide dough into two sections (this is the difficult part because it's so sticky!).  Flatten into rectangles (as best you can) about 1 1/2 inches thick, then wrap with plastic wrap.  Chill in the refrigerator overnight.

Day Two

Preheat the oven to 425 degrees F.  Line 2 large baking sheets with parchment paper or spray them with nonstick cooking spray.  Set aside.

Generously flour a work area and rolling pin.  With a rolling pin, roll the dough out to 1/4 inch thickness.  Using a 2/12 inch round cookie cutter, cut out circles and transfer to a baking sheet.  (Don't try any other shapes because the dough will expand in the oven!)  Bake for 7-8 minutes, until a pale golden color.  Immediately transfer cookies to a wire rack to cook.

For the frosting:
To make the frosting, in the bowl of a stand mixer fitted with the paddle attachment, cream together the butter and vanilla.  Slowly beat in the powdered sugar.  Once smooth and creamy, add in heavy cream 1 tablespoon at a time until the desired spreading consistency is achieved.

Once cookies have cooled completely, frost and add sprinkles.  Allow frosting to set, then store in an air-tight container.  Let cookies sit over night before serving to allow the flavors to develop.

Don't they looks delicious?! 
Recipe and picture are from The Novice Chef  

Wednesday, June 6, 2012

Recipe Binder

I love using items that I already have on hand to make my life easier.  In our apartment, we have a ton of unused binders.  Does anyone need a few for school or some craft project?  Come see me...I'll hook you up.  ha!  I constantly tease Chris about the number of binders we have and I never thought I'd find a use for all of them.  Thankfully (due to pinterest and the blog iheartorganizing) I've found plenty of uses over the past year and now you can find them all throughout our apartment.  Most recently, I have completed (for the moment) my family binder which makes finding things so much easier!  Today, I decided to remake my recipe binder because things needed to be added and fixed.


I started out with a handful of recipes (my husband is a picky eater) so it was always hard for me to find new things to eat.  I've slowly been expanding his palate and I think it's been going pretty well.  I've gotten good at sneaking healthier ingredients in our food and Chris is none the wiser (although, if he reads this blog I'm screwed).

Thanks to pinterest, I've been able to find great recipes that we can try and nine times out of ten we love the new recipe.  So, since I've been adding a lot of new food to our diet I figured it was time to expand my recipe binder.  The first thing I did was make categories and sub-categories:

1.  breakfast
2.  soups
3.  salads
4.  breads and muffins
5.  main dishes
(a) chicken
(b) beef
(c) pork
(d) steak
(e) vegetable
(f) pasta
6.  slow cooker
(a) chicken
(b) beef
(c) pork
(d) soup
7.  side dishes
8.  sweets
9.  drinks

Then I printed out a table of contents, used two 1 inch strips of colored paper to outline the sides (it needed some color!), and went on a search around the apartment for leftover dividers.  To be able to find the different types of poultry (in the main dishes and slow cooker categories) I took colored cardstock and placed those in-between them.


After my table of contents, I have two sections that precede the recipes:  

1.  Weekly Recipes
2.  Grocery Shopping List  


I love these two sections because it's so easy to get to the recipe I'm making that day, and it has all the ingredients I'll need for the week in one easy-to-get-to place.  I also made a family meal planning calendar last year and try to plan my meals out for the coming month.  That helps me to know exactly what I'll need when I go to the grocery store and I also know if I need certain bulk items during Costco trips.  This usually cuts down my trips to the grocery store significantly and I am all about saving time and money.

So, do you like to keep your recipes on index cards in a box or do you like the idea of a binder?  And as always, happy crafting!